The Lorax Unit

Friday, March 30, 2012

Head on over to Sub Hub to get their FREE printable Lorax unit and Mustache printable!!


We also had a Lorax snack!


Here are a few more great snack ideas!
Brown Barbaloots
The Lorax and Truffula Trees

We also made a paper Lorax and W did some descriptive writing:

More Lorax writing (from Sub Hub):


And then we planted some seeds! (peas and spinach, not Truffula Trees!).

Recipe: Roasted Cauliflower Soup

Wednesday, March 21, 2012

 I promised a recipe if this turned out and it was YUMMY! So here it is!

Ingredients:
1 large head of cauliflower cut into pieces
1-2 potatoes cut into large chunks
3-4 cloves of garlic
1/2 onion diced
2-3 celery stalks diced
1-2 carrots diced
4 cups chicken stock
2-3 cups water
bay leaf
Italian seasoning
salt and pepper to taste
EVOO

Cut the cauliflower into small chunks, and place on a baking sheet with the garlic, drizzle with EVOO. Roast at 375F for about 1/2 hour or until the florets start to caramelize and get brown on one side, turn if needed. In a large pot sauté the onion, carrot and celery in EVOO until soft. place all ingredients into the pot and cover with liquids. Bring to a boil and reduce to med-high heat until potatoes are soft.

I used a immersion blender, the hand held type to blend the soup right in the pot, but you could do it in batches in a blender also.

Serve with grated cheese, garlic toast and a napkin! MMMMMMMM!!!


Also head on over to Women Living Well for their Blog Hop today! I'll be there!


Recipe: Spicy Meatloaf

Monday, March 19, 2012


This was quite possibly the best meatloaf I've ever eaten! MMMMMMMMM!!

Ingredients:
1 1/2 to 2 lbs ground meat (beef, pork or turkey)
1 egg
1/2 c bread crumbs
1/4 c milk
1T Chili powder
1T Cumin
1 T garlic powder
1 T onion powder
1T Italian Seasoning
1/4 c tomato paste
1/4 c brown sugar
pinch of red pepper flakes
salt and pepper to taste

Mix together with hands and form a large loaf on a baking sheet, or place in a loaf pan. Bake at 375 for about 45 min, until juices are no longer pink. Serve with ketchup and a napkin!!

Volcanos! Part 2

Thursday, March 15, 2012

We continued or volcano unit with this fun mini coloring book from Crayola! And some volcano coloring pages for L (preschool).


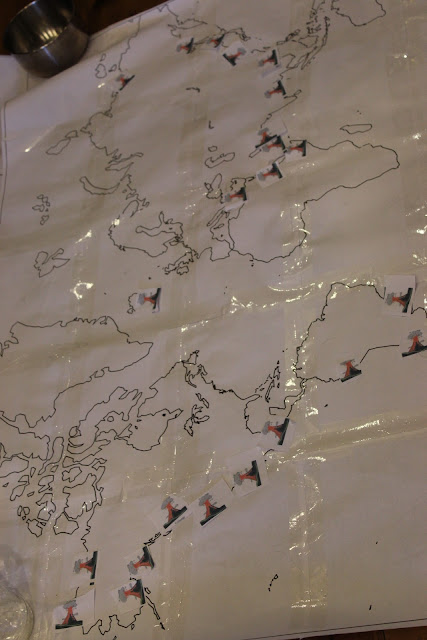
We took out our big maps and looked at where volcanoes are located all around the world using this map as a reference.

Potato Stamps

Monday, March 12, 2012

Do you remember making potato stamp art when you were a kid? If not, you need to try it now! Our stamps were pretty simple but I've seen some very creative ones out there!
Check out these ones:


Here is how we did our potato stamps!


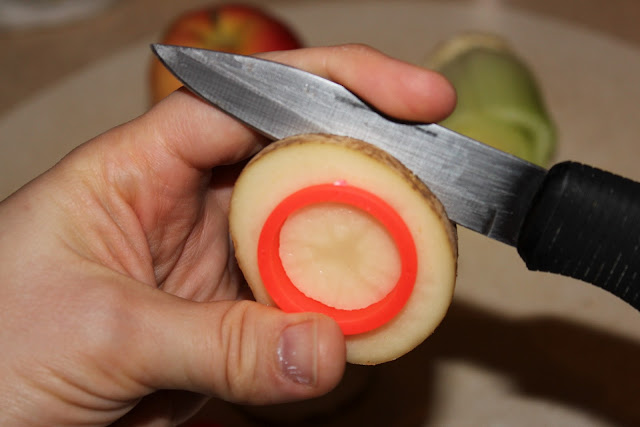
Using a small cookie cutter, gently press into the center of a cut potato.


Then turn cookie cutter down and gently hit it against a hard surface like your counter or floor until the cutter is pushed all the way in.


With a sharp knife (parents should help here) cut around the cookie cutter about 1/4 of an inch from the top.


Add paint and enjoy! We found they worked best if you used a paper towel to dab off excess paint before stamping on the paper.


We also tried a apple half and celery!


What kind of potato stamp shapes have you tired?

Fire Place Make Over!

Friday, March 9, 2012

Our house is old, and when we bought it, it was in severe need of some up-dating. Fast forward 5 years... and FINALLY we are getting around to making some changes.

After some research, and some convincing (of my husband) we decided to paint our old dingy fire place. The best instructions that we found for this DIY project were from Young House Love. If you follow their instructions you will have no trouble at all! 

I can tell you what NOT to do:

  • DO NOT use a water based paint, any leftover soot stains WILL show through!
  • Use a brush! We tried using a sprayer and there were plenty of places where the paint didn't cover. Our brick was very textured. Plus we got paint splatters all over the place!


Step 1- Wipe down your bricks with a moist (not sopping wet!) rag to remove any cobwebs or soot.
Step 2- If your bricks are especially soot stained, you’ll want to prime them with oil based primer to ensure that no soot stains bleed through your paint job. Neither of our fireplaces had this problem so we skipped right to step three.
Step 3- Use a nappy roller meant for textured surfaces to apply two to three coats of flat or semi-gloss latex paint (the finish is up to you). You also may need to rely on a paint brush to get into those deep grout crevices. Brick is an especially porous material (which explains why your fireplace may call for three coats) so be sure to have more paint on hand than you’d usually rely on for such a small surface area (our den fireplace took over a gallon of paint, and the one in our living room took nearly half a gallon).
Step 4- Do the happy dance cause you’re done. Easy, right? If you can paint a wall you can definitely paint a brick fireplace.
You can also check out the original post by clicking the link above!

BEFORE:


What not to do:


Spraying = MESS!!


Almost done, with our new paint color on the walls!


TADA!!


I love it, and it brightens up the room SO much! The total cost was about $30 for the can of paint and brushes.

Volcanos! Part 1

Wednesday, March 7, 2012

This week we are learning about Volcanos!


Here are some of the resources we are using this week!

Check out the Winecup Christian Academy for their Kindergarten volcano unit!

Today we watched these videos about volcanos and made volcano art! (pictured above).


Stay tuned for more molten fun!

Adventures in Making Maple Syrup: Part 2

Tuesday, March 6, 2012

So, to this date we have collected over 86 gallons of Maple sap! It's seriously getting out of hand! We had to clean out one of my husband  "storage" garbage cans (these hold his tree climbing and cutting gear for his business, not garbage!) to store the sap because we were running out of containers! We have probably boiled down about 30 gallons so far and our syrup is dark brown and sweet! 

First I'm going to explain how we tapped our trees. You can purchase spigots from places such as this, but they are kind of expensive if you are doing a small scale operation like we are, yes 90 gallons is small, remember it takes 40 gallons of sap to make one gallon of syrup! Plus we are cheap frugal around this house and wanted to spend as little money as possible. We decided to go with this suggestion and use plastic tubing and paraffin wax to make our spigots. 


My wonderful husband drilled the holes, we used about 1/2 inch tubing, so 1/2 inch holes. Then he drilled a screw right above the hole to hand the jugs on. We used Paraffin Wax (check the canning aisle) to seal around the tubing. Some sap will still seep down the tree but the majority of it will go through the tubing and into the jugs.  In order to seal the holes with the wax you will need to soften it first. I used and old tin can and placed the wax in the can then the can in a pot of warm water until it melted. Once it started to solidify again then it was the right consistency to rub on the holes. 


This is what our syrup looks like right now. We've strained it one and will do a final strain with some cheese cloth once we're done. 


So far we've just been boiling it on our wood stove in the house, but it's been getting warm outside and some days we don't put a fire on. We'll have to think of something a little more creative (as faster) in the near future! I don' want to be making syrup in July! :)


Adventures in Making Maple Syrup! Part 1

Friday, March 2, 2012

I'm Canadian, but I live in the US midwest. My neighbors think our family is crazy sometimes. We like playing outside in the snow, we made an ice rink in our back yard, and this winter we are going to try and make maple syrup!

This isn't totally foreign to me, but I did have to do a little research. Last spring we had the pleasure of going to a sugar bush and seeing the process of making maple syrup. I've been before, but my kids hadn't and they thought it was great! Their favorite part was the four wheeler ride into the bush!  These pictures are from our experience last year:


They had the whole set up, an actual syrup boiler inside their little sleep camp! They make syrup for their whole family. Our set up is definitely not as fancy, but here is what we used to get started!

SUPPLIES:

  • jugs or buckets to collect the syrup (one for each tree or tap).
  • Paraffin Wax (look in the canning aisle)
  • 1/2 inch clear plastic tubing
  • Drill
  • Screws
  • rope
  • large pail to collect the sap.   
You can purchase syrup making materials like spigots, but we did everything ourselves DIY style! Sugar Maple trees make the sweetest sap, but any type of maple can be tapped! Each tree should give about 5 gallons of sap (some more some less). Trees should be about 14 inches in diameter to be tapped. You need 40 gallons of sap to boil down to 1 gallon of syrup!

Watch for Part 2 for instructions on the how to!!