Glitter Christmas Stars

Monday, December 10, 2012


We made these purty little stars to add a little glitter to our great room. Here's how we did it!

First collect some cereal boxes, the bigger the better!:


I just searched online for a star template, make sure it's a "fat" looking star. Cut it out and trace it on your cardboard, then cut them out. 


Draw a straight line from one star point to the opposite side on two of the points, so you have a center to work from.


On all the other points work from the center out.


Then using a dull pair of scissors or a bone tool if you have one, score all the lines.


Where the lines go out to a point, bend the score marks up and the lines that go to the inside of the star, bend those down.


TADA!!


We used Modge Podge, but a little watered down white glue would work also. Paint all over with the glue and cover with sparkles!


Let them dry completely and we also gave them a coat of clear spray paint.


Hot glue some ribbons on the back and enjoy! :)


Pattern: Giant Knitted Christmas Stocking

Monday, December 3, 2012

A few years ago I wanted to make us all matching Christmas stockings. I couldn't find a large enough stocking for what I needed so I modified a pattern that I found to make my own! The measurements for this stocking are on the last pictures and you can download this pattern at the end also! 

Enjoy!


Download a printable Word doc version HERE!

Giant Knitted Christmas Stocking

Materials:
US # 10.5 12 inch circular needle
US # 10.5 DPN
Chunky weight yarn 2 colors
I recommend Lion Brand Jiffy, but other chunky weight yarns work.

Using circular needles CO 56 sts.

Join and work around in St st. for 12-inches, approximately 55 rows. Be sure to place your marker at the beginning of the row and leave it even when making the heel.

K across first 15 stitches, then changing to DPN:
Sl 1, K 26, turn
Sl 1, P to end of needle, turn
Rep last 2 rows (working back and forth on needle)
9 times more (10 total).

Still working back and forth on DPN:

1) Sl 1, K16, SSK, turn
2) Sl 1, P8, P2tog, turn
3) Sl 1, K to 1 st before gap, SSK, K1, turn
4) Sl 1, P to 1 st before gap, P2tog, P1, turn

Rep 3 & 4 until 10 sts remain.

Using circular needles, pic up 11 stitches
with each on either side of the 10 heel stiches.
Knit across 21 of the heel stitches, back to
where color 1 begins. Break color 2 and begin
knitting with color 1 back to the marker. 
This is now the beginning of round.

You should now have 60 stitches.
Next:
1)  K 1 round even
2)   K 13, SSK, K32, K2Tog, knit to end of row
3)  Decrease 8 stitches evenly aound
 (K6, K2tog, K5, K2tog around). 50 sts.
4)  K11, SSK, K24, K2tog, knit to end of row
5)  Knit 1 row
6)  K10, SSK, K24, K2tog, knit to end of row

48 sts rem.

K around even until 8-inches from beg of heel about 28 of color A and 1 row of color B.

Next:
1)  K11, SSK, K2, K2tog, K22, SSK, K2, K2tog,
knit to end of row
2)  Knit 1 round even

repeat last 2 rounds twice

Next:
1   1)    K4, K2tog* repeat around
2   2)     knit 1 round
3   3)    K3, K2tog* repeat around
4   4)    Knit 1 round
5   5)    K2, K2tog* repeat around
6   6)    Knit 1 round
7   7)    K1, K2tog * repeat around
8   8)    Knit 1 round.

16 sts remain.  Cut yarn leaving long tail,
run tail through rem sts. Weave in ends.

For the loop I just made an I-cord and
sewed it on. I also made a fabric liner by tracing the stocking on two layers of fabric, but out and sew. Turn down the top edge and hand stitch the lining into the stocking. 


Tutorial: Giant Knitting Needles

Wednesday, November 21, 2012


Hey again!

Blogging has been a bit sparse lately, it usually is at times. We are struggling with some behavior issues and some homeschool bumps in the road. Keep us in prayer if you do!

I wanted to share the AWESOME knitting needles my husband helped me make. Sometimes I have these crazy ideas that flood my brain and this time he obliged me and went along with it, I think because it involved using power tools! :)

I have been seeing these gorgeous chunky knit blankets and scarves on Pinterest lately. I tried looking around online for some large sized knitting needles but they were kind of expensive (about $15 for just one set) and they didn't seem to make the huge sizes I was looking for. So I thought to myself, I bet I could make some! 

My husband didn't want me snapping any pictures of the "progress" because he said his methods weren't exactly safe, so here's my disclaimer... I don't recommend trying this at home, but here is how we did it!

What you'll need:
3 different sizes of wooden dowel (I used the cheapest kind at the hardware store, poplar). about $10
           (I used 5/8, 3/4, and 7/8 inch.)
I pkg of necklace clasps (the screw kind) $2.50
plastic tubing $2.50
super glue
fine sand paper (220 grit) for final sanding
40 and 120 grit sanding belts for initial sanding
belt sander (or table sander if you have one)
vice


 Hubs did the initial sanding with his belt sander clamped upside down in the vice. Like I said, not the safest method, but a farm job for sure! We cut the dowel in about 6 inch chunks and using one of my bought needles, just eyeballed the angle for the tips. The knitting tip is a lot more slanted than the tip where the yarn comes back on the needles. I wanted to make the needles adjustable so I could use them at any length so that required drilling a small hole at the "butt" end to insert on of the jewelry clasps.  Use the super glue to secure them. 

Once the general shape of the needles was made, I hand sanded them to make them really smooth. They will still be a bit tacky at first so to remedy that just rub them together and the wood smooths it self. 

Cut the appropriate amount of tubing 
(30 inch = 6+6 inches from the needles +18 inches of tube).
(24 inch = 6+6 inches from the needles +12 inches of tube).
(12 inch = 6=6 inches for from the needles + 6 inches of tube).


Glue the opposite ends of the jewelry clasps into the tubing and let it all dry! The whole thing took about 1 hour to do and cost me about $30 only because I had to buy the belts for my husbands sander. You could even make the tubing super long and make one of those beautiful chunky blankets or even knit a hammock with some rope!


Set the Table Place Mat Printable!

Saturday, September 15, 2012

Our unit study coming up this week is Manners!! We will be learning table manners as part of our study this week and I thought proper table manners and proper table setting would go great together! My kids often "set" the table but most of the time it looks like the preschooler did it. You can print off the 2 halves of this place mat, stick them together and use them as a guide for a simple place setting! Enjoy! 

Place mat 


Link to left half here  (click the picture):


Right half:


Addition and Subtraction Posters

Thursday, August 30, 2012

Here are some freebie posters I whipped up today for learning addition and subtraction key words.


Click HERE to download the addition poster (prints on a regular piece of printer paper). 


Click HERE to download the subtraction poster!

ENJOY!

Host a Pinterest Party!

Friday, June 29, 2012


Anyone who is on Pinterest knows that the running joke is that we all pin and never do any of them! I think Pinterest is a great resource, so if you need a jump start to get some of your pins done, try hosting a Pinterest Party!!

Here is a free invitation printable to start off your Pinterest party! 
You could make it themed, have a girls night,  even do it near a Holiday and get some decorations made!

What is on your Pinterest To Do list??


Pretty Polkadot Background

Friday, June 8, 2012


I'm still learning and learning how to use photoshop. Today I saw a really cute little verse on Pinterest that inspired me to make a background for some scripture verses that I've been wanting to post in my kitchen.

So, I thought I'd share my little creation with you!

Here are the links to the blank psd. file and the one you see above with my verses in them in jpg. format. It is sized to print off on a 8.8x11 sheet of paper.

Enjoy!

Summer Pinterest Challenge!

Monday, May 28, 2012


**I've completed a few of my challenge pins! I think I'm running out of summer! :D


The running joke on Pinterest is that you spend most of your time "pinning" and less of your time actually doing all the cool things you have pinned! This summer I am putting out a challenge to actually DO some of those AWSOME ideas we've pinned on Pinterest!

If you need an invitation please feel free to message me and I can invite you to join Pinterest, also check out my boards and follow me!

So here is how the challenge is going to work:

  1. Choose 10 boards
  2. Choose 2 topics from each board to complete over the summer.
My suggestion would be to balance your projects, choose a few large ones, several medium sized ones and a few small ones. 

Here are my projects for the summer:
DIY:
  1. Dresser Re-do (inspiration1, inspiration 2). (big)
  2. DIY Bleach T-shirt (small)
PHOTOGRAPHY:
  1.  30 Day Challenge (big)
  2. Baby Bean (make or purchase) and Back drop (medium)
SEWING:
  1. Ruffle T-shirt (small)
  2. Casserole Tote (small)
FOR THE HOME:
  1. Bling my stand mixer (small)
  2. Old Window Picture Frame (small) I have just the window for this!!!
CRAFTS:


GARDEN:
  1. Seedling Starters (Medium)
  2. Stacked Flower planter (medium)
PARENTING:
  1. Chore Door Hanger (small)
  2. Devotional book (purchase) (small)
LAUNDRY ROOM:
Now not all of these are direct links to patterns, but just inspiration for the projects I want to complete this summer. I hope to blog about the projects as I complete them!

Have fun and Happy Pinning!


Privacy Door Hanger

Tuesday, May 22, 2012


We live in a great neighborhood. I like all my neighbors and all of our kids play together. However, my kids are the youngest in our group of houses an they still need rests in the afternoon. Sometimes the older kids ring the door bell right in the middle of nap time!! ACK!

Here is a new idea that I am sharing with you! It's s printable door hanger that you can use to let kids know that it is play time or not! Now that school is out the kids are just raring to go!

You can print it off on an 8.5x11 piece of card stock, cut out the hole (once folded trace and cut the hole on the second side) and laminate!

I have to say this idea wasn't original to me, I saw it on Pinterest. But sadly when I went to the blog I wasn't able to print the document. Do kudos to the mom that originally thought of this!

Enjoy!

Knitted Finger Puppets

Thursday, May 17, 2012

Here is a cute little tutorial that I posted on Crafster several years ago. I just pulled these little guys out of my diaper bag today before I threw it in the wash. They have held up quite well and the kids love using them in the car. 

All were made with worsted weight yarn from my scrap stash. Knitted on size 3mm Double Pointed Kneedles. Cast on 15 stitches and divide btw 3 needles. Knit in the round for about 20-25 rows. Decrease row: K2tog, knit 1 K2tog. Knit 1 row. Next decrease row: K2tog, knit 1. Knit 1 row. Break yarn and draw through all sts. 

Instructions for individual animals are after each picture.
All the animals:


Zebra:

Knit 3 rows of white, 1 row black. repeat twice. FInnish in white. To make ears, pick up 2 stitches on side of head knit 3 rows, K2tog, break yarn and fasten. To make the hair, usingblack tie a row of knots and trim to desired length. Embrioder nose and eyes. For tail use 3 strands of black and braid.

Elephant:

For nose cast on 3 sts and work in I-cord until desired length. Ears cast on 5 sts work 2 rows then decrease every other row until 2 sts, break yarn and draw through.

Lion:

work in one colour, embroider face. To make the mane I tied individual strands all around the face, trim to desired lenth.

Tiger:

Knit 5 rows of orange, 2 black, repeat finishing top with orange. Ears are worked the same as zebra minus a row, in black.

Monkey:

Ears are same as tiger, tail knit in I-cord.

Mini Plant Hanger

Wednesday, May 9, 2012


I wanted some tiny hanging pots for my little shepherds hook in my front yard. After searching at some local green houses and stores I couldn't find anything that was small enough or very colorful.

I decided to purchase some small plastic pots and make my own hangers! Check out The Skinny Laminx.com for the original inspiration.

What you'll need:
1 metal ring (circular or D rings, I just used what I had in my craft stash).
twine or string 6 40-60 inch lengths (use a more plastic type string for outside use if you want it to last a while).
1 light weight plastic flower pots.


 Here is how I did it!
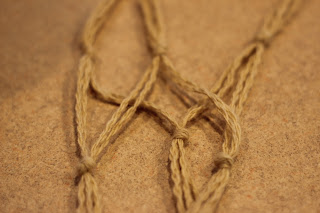
Measure and but the string, fold in half and insert the loop into the ring. Then pull the ends through the loop, securing the string around the ring:


Divide the string into 3 sections (4 strands each). Where you tie you knots depends on how long you want your hanger to be. Mine is fairly short so I measured down about 9 inches and tied a knot on each section of strings:


Then divide the sections in half again and taking 2 strands from 2 sections tie another knot 3 more inches down. Do this 3 times total:
Hope this isn't getting to confusing!


Divide and tie knots 3 inches down again, then 3 more inches down tie one large knot with all the strands and trim a tassle:


And there you have your mini plant hanger! 

Clothespin Apron

Friday, May 4, 2012

*edit* Here is a great summer sewing project! I've been using this apron since last year and I LOVE IT! It makes hanging clothes on the line that much easier!

I love using my clothesline! It is frugal, it gets me outside and it is almost calming in it's own methodical way! For years I've carried my pins around in a plastic container or bucket, it's kind of a pain. We have a stationary clothesline that is 4 lines across. So I have to move my bucket with me every time I move down the line and it is a given that I drop about 10 clothespins every time! I've been wanting to make one of these aprons for a while and finally got around to it last week! Here's how I did it!

What you'll need:
  • 2 Fat Quarters (1/4 of a yard of fabric each)
  • about 1/2 yard of contrasting fabric
  • scissors
  • sewing machine
  • pins
  • thread
Fold the fat quarter in half width wise and press.


Cutting from the fold out, cut a curve along the bottom edge.


Use the first curve as a template for the second. You should have 2 identical pieces.


Out of one of the pieces cut out a hand sized piece for the pocket. Be sure to cut along the edge, not the fold!


Using the contrasting fabric, cut 2 inch strips, fold in half and press. This will be the edge for the pockets. Pin the strips with the raw edges together around the edges of the pockets, and trim.


Sew with a scant 5/8 in. seam, then press the edge outwards. Turn the edge under and pin.


Sewing close to the seam, top stitch the edging.


Do the same with the other pocket. Then lay your pocket piece on top of the other piece.  It should look like this:


Complete the edge for the outside in the same manner as the pockets.


This is what it looks like with the edge complete.


For the waist tie strap, measure a 4 inch strip out of the contrasting fabric. You will need a piece about  2 yards long, so you may need to piece strips together. I made mine pretty long  so I could wrap it around and make a pretty bow in the front.


Mark the center of the waistband and match it up with the center of the apron. Make another mark about 2 inches outside the width of the apron.


Keeping the centers matched up, unfold the waistband and pin one of the rough edges to the apron. Sew along the edge of the waistband and apron securing them together. Press the waistband up. On the wrong side fold under the raw edge of the waistband and pin. Top stitch all the way around the waistband, securing it and hiding the raw edge on the wrong side.


 Put your apron on, put some clothespins in it and run outside to hang laundry on the clothesline (try not to skip along the way!)